===============================================================
Main screen
Understanding the Main screen
The main menu has been divided into four main areas: The patient section, the doctor section, the drug section and the Rx pricing section. Each section has been formatted with a different color font to make it easier for the user to identify the information you are looking for much quicker.
Patient section:
The fonts on the patient section are BLUE and have two searchable fields. As you can see the two fields have the bottom right corner marked with Green triangle which means they are searchable. They are also marked with a red triangle at the top right corner meaning they are mandatory fields.
Doctor Section:
The fonts on the doctor section are PURPLE and have two searchable fields. As you can see the two fields have the bottom right corner marked with Green triangle which means they are searchable. They are also marked with a red triangle at the top right corner meaning they are mandatory fields.
Main screen window:

Drug Section:
The fonts on the doctor section are BROWN and have two searchable fields. As you can see the two fields have the bottom right corner marked with Green triangle which means they are searchable. They are also marked with a red triangle at the top right corner meaning they are mandatory fields.
Mixture Section:
You can switch between the mixture section and the drug section by clicking on the mixture button when the drug section is being displayed and click the close button when the mixture section is being displayed
The fonts on the mixture section are BLACK and have two searchable fields. As you can see the two fields have the bottom right corner marked with Green triangle which means they are searchable. They are also marked with a red triangle at the top right corner meaning they are mandatory fields.
Rx Entry Detail Section:
The fonts on the Rx pricing section are GREEN and have two searchable fields. As you can see the two fields have the bottom right corner marked with Green triangle which means they are searchable. They are also marked with a red triangle at the top right corner meaning they are mandatory fields.
RX functions
Creating a new prescription
Step 1
Enter the patient name (Last Name, First Name), the system will do a search and if it does not find a match it will ask you whether you would like to create a new patient. If you select yes, a blank patient detail window will open, and if you click on ‘NO’; the system will return to the patient search field for you to make another search.
Step 2
Enter the Doctors name (Last Name, First Name, or Doc#). If the system does not find a match in your local database, it will search in the ministry database and it will bring to the doctor details window. If after doing a search the system still does not find a match it will prompt you with a question asking you if you would like to create a new doctor. If you choose YES, the system will open the doctor detail window for you to enter all the necessary information. If you choose NO, it will return to the doctor search field for you to perform a new search.
Step 3
Enter the drug name (either by DIN in the din field or by GENERIC or trade name on the name field, you can also place a comma and a strength after the name to shorten the search by strength).
The system will perform a search and display the results for you to make a selection. Once you make selection, the system will automatically search for interchangeable drugs and display them for you to choose.
If the system does not find a match; it will prompt you whether you would like to create a new drug. If you choose YES the system will open the drug details window for you to enter all necessary information. If you choose NO the system will return to the drug search field for you to perform a new search.
Step 4
Once the drug section has been completed, the system will move you to the Rx entry section; placing the cursor on the qty field. The first three fields are calculated (qty, remaining and authorized) automatically if any of the other fields are filled. For example: if you enter a qty and remaining the authorized will be calculated or if enter a qty and an authorized amount the remaining will be calculated. After entering the qty, remaining, authorized, you must enter a day supply, directions. At this point you also have the option of putting the RX on hold by placing a checkmark on the HOLD RX box, and NO SUB by placing a checkmark on the no sub box. You also have the option to enter RX notes which do not print on the label. In the RX pricing details there are two options that automatically get selected depending on your configuration settings; coverage, and price base. At this point you have completed entering al the information to create a new RX, when you press ENTER the system will bring the label options if the customer is paying cash, or the ONLINE submission window for online billing and then the label options.
Refilling an RX
Refilling an RX is relatively simple. There are two methods to refill and RX.
Method 1 - refilling with prescription number
You can refill an RX by typing the RX number on the patient search field. The system will display a red menu bar at the top part of the screen with options for you to choose. These options are: Refill, Amend, Copy, Reverse, Queue, Reprint, Add to, Drug Info and Cancel (this cancel means you don’t want to do anything to the RX on the screen).
You will select refill to refill the RX, the system will check if there is any remaining left. It there is, the RX will be displayed on the screen for you to make any changes you want, if there are no changes just press enter to proceed to the online window for online billing or the label window for a cash paying customer.
If there is no remaining, the system will display a small window in the center of the screen, for you to make a choice, whether to authorize now or authorize later.
Press enter to continue to the ON LINE submission window for on line billing or the label window for cash paying customers.
Keep in mind that if you choose authorize later, you must authorize it later from the patient Rx Profile screen before you can refill this RX again.
Method 2- refilling from the patient history
Start by finding the patient you need to refill the RX for. Once you have found the patient, press F4 or click on patient history. The patient history window will be displayed. Here you will see his/her last filled prescriptions.
Select the RX you want to refill and click on the refill button.
The system will check if there is any remaining left. It there is, the RX will be displayed on the screen for you to make any changes you want, if there are no changes just press enter to proceed to the online window for online billing or the label window for a cash paying customer.
If there is no remaining, the system will display a small window in the center of the screen, for you to make a choice, whether to authorize now or authorize later. Press enter to continue to the ON LINE submission window for on line billing or the label window for cash paying customers.
Keep in mind that if authorize later, you must authorize from the patient history screen before you can refill this RX again.
Multi fills
You can also refill multiple Rxs by going into the patients profile and marking each rx using the space bar and then clicking on refill. This process is called multi-fill. The system will ask if you are trying to do a multi fill. Click on Yes and the system will bring each prescription onto the main screen one at a time.
Amending a Prescription
Amending an RX is relatively simple. There are two methods to amending an RX.
Method 1 - amending with prescription number
You can amend an RX by typing the RX number on the patient
search field. The system will display a red menu bar at the top part of the
screen with options for you to choose. These options are: Refill, Amend, Copy,
Reverse, Queue, Reprint, Add to, Drug Info and Cancel (this cancel means you
don’t want to do anything to the RX on the screen). Once you click on amend the
system will bring the RX on the screen for you to make any changes you want.
Keep in mind that if the prescription was billed online, you can
only amend directions, doctor, and rx notes. You cane change anything if you reverse the rx first. If the prescription was billed as cash, you can change anything.
Method 2- amending from the patient history
Start by finding the patient you need to amend the RX for. Once you have found the patient, press F4 or click on patient profile. The patient profile window will be displayed. Here you will see his/her last filled prescriptions. Select the RX you want to amend and click on the amend button. The system will bring the prescription on the main screen for you to make the changes you need.
Once you make the changes you can click on ok and the system will bring the print label window in case you want to print a new label with the new saved changes.
Patient Profile window:
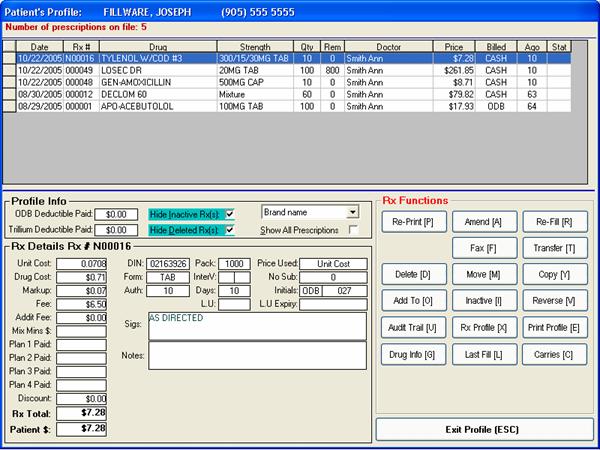
Patient Functions
Searching for a patient
Type the last name, first name on the patient field. The system will display a listing of all the patients that match your search criteria. Select your patient from the list, then the system will display his/her information on the main screen. It is not necessary to enter to many characters in order to make a search but the more letters you use the more accurate the result will be.
Creating a new patient
Click on the new button on the patient section on the main screen. This will bring up patient details window. Enter all necessary information and then press the save button and exit. The information for the patient you just created will be displayed on the main screen.
Entering the plan information for the patient:
You must select a plan code from the list and depending on which plan you have selected, you will fill in the appropriate information.
For example:
For Ontario Drug Benefit (ODB) all you need to enter is the ID, Carrier, Expiry date for monthly cards and card holders name

Method of entering other plans:
Green Shield (GS)========è
all you need to fill is the ID, and code Example: if the card says
12345-00, then you should enter Id: 12345 and Code: 00

Shared Health/Assure:
ESI
Indian affairs
RX Plus
Blue Cross Veterans
Johnson Insurance
MDM Insurance
Adding Limited Use codes
Search for the patient you want to add the limited use for, and then click on edit patient. The system will display the patient detailed information. Click on the button called Med Info, and then click on the tab above called limited use.
You must enter all the information required before you can save the LU in the patient record. Type the drug name and the system will search for it. Once you find the drug, the system will display a list of Limited use codes for you to choose. Then you must enter the name of the doctor providing the LU form, and last you must enter an expiry date.
Adding Medical conditions
Search for the patient you want to add the medical condition, and then click on edit patient. The system will display the patient detailed information. Click on the button called Med Info, and then click on the tab above called med info. Click on the button called medical conditions. The system will display a list of medical conditions available.
You will see two list boxes. The list box on the left, are the available medical conditions you can choose from and the list box on the right are medical conditions you have selected. To add a medical condition: select it from the left side and then click on the button in the middle with the arrows pointing to the right.
Adding Allergies
Search for the patient you want to add the allergies, and then click on edit patient. The system will display the patient detailed information. Click on the button called Med Info, and then click on the tab above called med info. Click on the button called allergies. The system will display a list of allergies available.
You will see two list boxes. The list box on the left, are the available allergies you can choose from and the list box on the right are allergies you have selected. To add Allergies: select it from the left side and then click on the button in the middle with the arrows pointing to the right.
Note: You
also have the option to add allergies and medical conditions manually if they
don’t exist on the database by typing free form on the text box on the right
side called free form allergies.
Drug
Functions
Searching for a drug
To search for a drug you can type the brand name, generic name or Din in the din box. When searching by name you can put a comma and then type the strength in order to speed up the search; the system will display only the drugs that met that criteria.
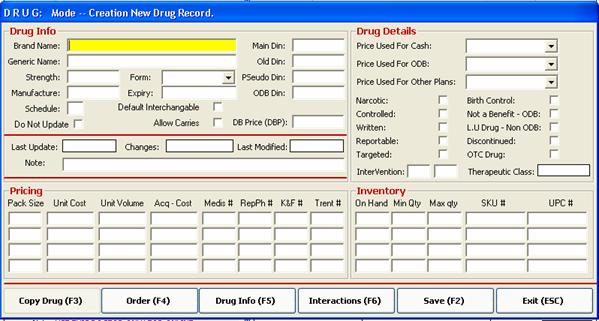
Creating a new drug
If you need to create a new drug, just click on the button that says new drug or try searching for the drug and the system will ask if you want to create a new if it does not find it. If the system displays a list of drugs but the one you need is not there, you can click on the new button at the bottom of the list being display and the system will bring you a blank window where you can create a new drug. There some mandatory fields that must be entered before you save the new drug for example: Brand name, generic name, DIN, Unit Price, Pack size,
Amending drug details
To modify a drug information; you first do a search for that drug. Once you find the drug and select it, it will be displayed on the screen. You have to pres F8 or click on the button labeled Edit drug, and the system will display all the details of the drug. Be careful what you change in this window as it can create problems when filling a prescription. Once you completed modifying the drug details, you must press the button labeled Save and Exit.
Drug details window:
Mixture
functions
Creating a new mixture
Creating a mixture prescription is almost the same as creating a regular prescription. The only difference is that the area where you enter the drug will display the mixture information.
Enter the patient name, then enter the doctor name, then when you get to the drug section; press the button labeled Mixture. The drug section will change to the mixture information. Click on the Search button to search for existing mixtures or type a few letters of the mixture and press enter to search. You can also click on new mixture if you want to create a new mixture.
Creating a custom mixture
In the mixture window you will see two fields called Overwrite mixture cost and Overwrite Rx price. If you select overwrite mixture cost, the system will ignore the price in each ingredient and calculate the markup based on the amount that you entered on this field. If you enter and amount on the Overwrite Rx price, the system will calculate the total Rx price based on this amount, ignoring other prices from drug unit cost and fees, markups etc.
New Mixture window:
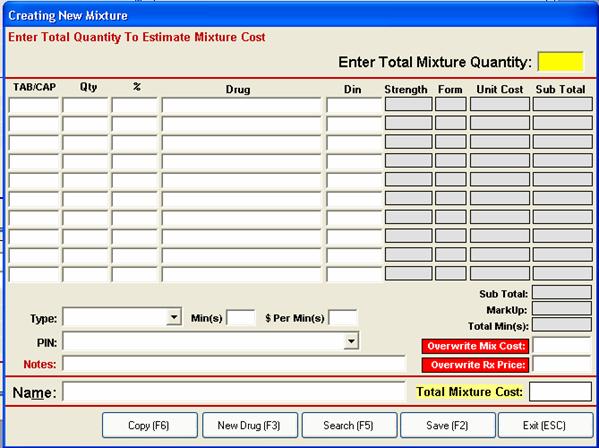
Amending a mixture
To amend a mixture you must first search for the mixture and once you select it and bring it to the main screen, you must click on the button labeled Edit Mixture and you will get the above screen displaying all the ingredient details of the mixture
Copying a mixture
Understanding mixture details
The mixture window has various fields and sorted in columns and rows. The first field is the Total Mixture Qty field where you enter the total amount of the mixture ( it is recommended to create the mixture based on 100 percent, that way the system can adjust the values according to the quantity you are dispensing without having to create a new mixture every time) . There is a column for tablets/caplets where can enter the number of tabs or caps if the doctor specified that. You also have a column for quantity and a column for percentage. Which ever amount you enter the system will adjust and calculate the value for the other columns. At the time of dispensing an RX, the system will adjust the values accordingly to the amount you enter on the main screen. The field labeled Type is where you select things like topical lotion, topical cream, etc…
In the DIN/PIN you can enter the din number given to you by the insurance company if it is different then the ones in the formulary. You must enter minutes and price per minute and a mixture name before you can save the mixture.
Merge functions
To get to the merge function you must click on menu, go up to utilities and then clicking on Merge. In this window you have two option buttons at the top. Option 1 will allow you to merge patients. Option 2 will allow you to merge doctors. Always remember that the primary section is the one that will be kept on the system and the secondary will be deleted. All the prescriptions from the secondary will be moved to the primary patient or doctor.
Label functions
The label window has various options like printing default message, printing an owe label, printing split label, printing the patient condensed profile, printing multiple labels, printing custom messages, Printing Drug info on a refill, etc..
Creating or modifying directions (sigs)
Click on menu and then go up to utilities and then click on directions.
The system will display all the directions from your
database. You can select it from the top and click on edit. The system will display the translation for
that particular sig. Make the changes
necessary and then click on save. In order to create a new sig, you must click
on the button called new. You can also
specify how the system should consider this sig to calculate days supply. For
example: if I want the system to
calculate 15 days when dispensing 30 tabs BID, I would type 2 in the multiple
box. The system will divide the dispensed quantity by this multiple (2).
Cash and Insurance Pricing Structures and Birth
Control Pricing
The system calculates fees and markups according to what ever has been configured in the pricing structure in the insurance settings. Click on the menu button and move up to utilities, and then click on Insurance Plans. The system will display a window with details about the insurance plans available in your database. You must select an insurance plan from the drop down list at the top of the window. Once you select the insurance plan you can change the dispensing fee, the mark up percentage, and any additional up charges. You can also change online transmission settings like internet sending or modem sending, phone numbers, provider Ids, birth control pricing
In the bottom portion of this window you will see the additional up charges where you can set charges based on days supply or cost up charge and you can apply it to the drug cost or fee or additional fee. You can use a dollar value or a percentage of the fee or cost.
Working with the queue
Understanding Online submission Window